
Why Does Budget Management Matter in F1 Fantasy?
Every F1 Fantasy team starts with $100M, the same cap for all players. But by season's end, the best managers often have $107-110M or more to work with. That extra budget isn't just a number. It unlocks team combinations that $100M players can't build. A $107M budget gives you access to roughly 40% more valid team combinations than $100M, including lineups with two premium drivers that would otherwise be impossible.
Budget management is the skill that separates the top 1% of F1 Fantasy players from the rest. It's not about picking the most expensive team. It's about strategically growing your budget early so you can afford the best team later.
TL;DR: Grow your budget by exploiting Tier B price swings ($0.6M per rise vs $0.3M for Tier A) in the first 4-5 races. Target underpriced drivers about to enter a strong 3-race rolling window. Once you reach $105M+, switch to maximizing fantasy points with the Apex Team Optimizer. The budget advantage compounds, and every extra million opens significantly more team options.
How Does Your Budget Change Over the Season?
Your budget equals $100M plus the net price changes of all drivers and constructors currently on your team. When a player on your team rises in price, your budget grows by the same amount. When they fall, your budget shrinks.
Critically, you only capture price changes for players currently on your team. If you sell a driver and they rise the next week, you miss that growth. If you buy a driver right before they rise, you capture it.
This creates the fundamental budget game: predict which players will rise, buy them before the rise happens, capture the growth, and repeat.
Price changes are driven by the PPM (Points Per Million) system. Read our complete guide to F1 Fantasy price changes for the full breakdown of how PPM thresholds trigger rises and falls.
What's the Tier A vs Tier B Price Strategy?
F1 Fantasy divides all players into two price tiers with different price change magnitudes:
| Tier A ($19M+) | Tier B (Under $19M) | |
|---|---|---|
| Maximum rise per race | +$0.3M | +$0.6M |
| Small rise | +$0.1M | +$0.2M |
| Small drop | -$0.1M | -$0.2M |
| Maximum drop | -$0.3M | -$0.6M |
The asymmetry is striking. Tier B players move at double the rate of Tier A players. A Tier B driver on a hot streak gains $0.6M per race, which is $1.8M over three races. The same streak from a Tier A driver yields only $0.9M.

This doesn't mean Tier B is always better. Tier A drivers tend to score more points because they're priced higher for a reason. The strategy is about when to prioritize each tier.
The Budget Growth Phase (Races 1-5)
Early season is when budget growth matters most. Every dollar gained now compounds for the remaining 19+ races. During this phase:
- Fill 2-3 roster spots with Tier B drivers who have high PPM potential
- Target drivers priced $14-18M who are underperforming their car's capability
- Look for drivers with easy "drop-off" races — low-scoring races about to exit the 3-race rolling window
- Accept slightly lower weekly points in exchange for budget growth
The Transition Phase (Races 6-10)
Once your budget reaches $103-105M, begin trading Tier B risers for Tier A scorers:
- Keep 1-2 Tier B drivers still in a rising phase
- Move the rest of your budget into consistent Tier A performers
- Use the extra budget to upgrade one driver slot from a $16M pick to a $22M pick
The Points Phase (Races 11+)
With a budget of $105M+, switch entirely to maximizing points. Use the Apex Team Optimizer to find the highest-scoring lineup within your expanded budget. The budget advantage is permanent — you're now playing with options that $100M players don't have.
How Do You Identify Underpriced Drivers?
An underpriced driver is one whose recent performance exceeds what their price suggests. The simplest way to spot them: their PPM (Points Per Million) is above 1.0 consistently.
Here's what to look for:
Recent team upgrades. When a constructor brings a significant car upgrade, their drivers' performance jumps but their price hasn't caught up yet. The 3-race rolling window means it takes time for the price to reflect improved results.
Returning from injury or penalty. A driver who missed a race due to illness or started from the pit lane due to penalties will have artificially depressed PPM from those events. As normal results replace the bad ones in the rolling window, their price rises predictably.
Track clusters favoring their car. Some cars perform better at certain track types. A midfield team that excels on high-speed circuits will see their drivers' PPM spike during clusters of power-sensitive tracks (Spa, Monza, Jeddah).
The early-season data gap. In Races 1-3, the rolling window uses fewer data points, making prices more volatile. A driver who has one great race in a 1-race window will have inflated PPM. Conversely, one bad race tanks it. This volatility creates buying opportunities for drivers you believe will normalize upward.
The Budget Boost page shows exactly which drivers have the highest probability of a price rise, with percentage breakdowns for each possible price change.
When Should You Sell a Rising Driver?
Selling is as important as buying. Here are the signals to sell a Tier B driver you bought for budget growth:
They're about to cross the $19M threshold. Once a Tier B driver's price hits $19M, they enter Tier A and their max rise drops from $0.6M to $0.3M. The growth rate is halved. Sell before this happens if budget growth is your goal.
A high-scoring race is about to drop off their window. Check which race will exit the 3-race rolling average next. If the driver scored 30+ points in that race and their upcoming track doesn't favor them, their PPM will likely drop. Sell before the correction.
You've captured 3-4 consecutive rises. After $1.2-2.4M of growth from a single driver, the risk-reward shifts. Their price is higher (meaning PPM thresholds are harder to clear), and the market may be catching up. Lock in the profit and rotate to a new growth candidate.
Better options emerge. Always compare your rising driver's expected future growth against other available picks. A driver who's risen $1.8M and is plateauing is less valuable than a fresh pick about to enter a strong window.
How Do Transfers Affect Budget Strategy?
F1 Fantasy gives you a limited number of free transfers per race week (typically 2-3). Additional transfers cost points. This constraint is critical for budget strategy:
Use free transfers for budget rotation. Your 2-3 free transfers should prioritize replacing drivers whose price growth has stalled with fresh rising candidates. Don't waste free transfers on lateral moves.
Avoid point-penalty transfers for small gains. A transfer penalty of -10 points for a driver expected to rise $0.2M is a bad trade early in the season. The math: $0.2M of budget growth must generate more than 10 extra points over the remaining season to be worthwhile.
Save the Wildcard for major restructuring. The Wildcard chip gives unlimited free transfers for one race. Use it when you need to overhaul 4+ positions simultaneously, like after a regulation change that reshuffles the competitive order.
Combine Wildcard with budget analysis. When you play your Wildcard, use the Apex Team Optimizer with a focus on high xDelta (predicted budget change) instead of maximum points. Rebuilding your entire team around budget growth during a Wildcard can generate $2-3M in a single week.
What's the Optimal Team Structure for Budget Growth?
A budget-growth optimized team looks different from a points-optimized team:
The Growth Structure
- 2 premium drivers ($22M+): Your reliable point scorers. They won't grow much in price, but they ensure competitive weekly scores while your budget picks do the growing.
- 2 budget growth drivers ($14-18M): Your growth engines. High PPM potential, Tier B price swings. Rotate these every 3-4 races as growth plateaus.
- 1 swing driver ($18-20M): A driver near the Tier A/B boundary. Either a Tier B driver about to cross into Tier A (sell soon) or a Tier A driver on a dip (buy the dip).
- 2 constructors: At least one top constructor (consistent teamwork +10 and pit stop points). The second can be a midfield team with growth potential.
The Points Structure (After Growth Phase)
- 3 premium drivers ($22M+): Maximize weekly scoring from your expanded budget
- 2 value drivers ($16-20M): Good PPM but chosen for points over growth
- 2 premium constructors: Both top teams for consistent teamwork and pit stop bonuses
The transition from growth to points structure typically happens around Race 6-8, depending on how successful your early growth phase was.
How Does the Apex Team Optimizer Help With Budget Strategy?
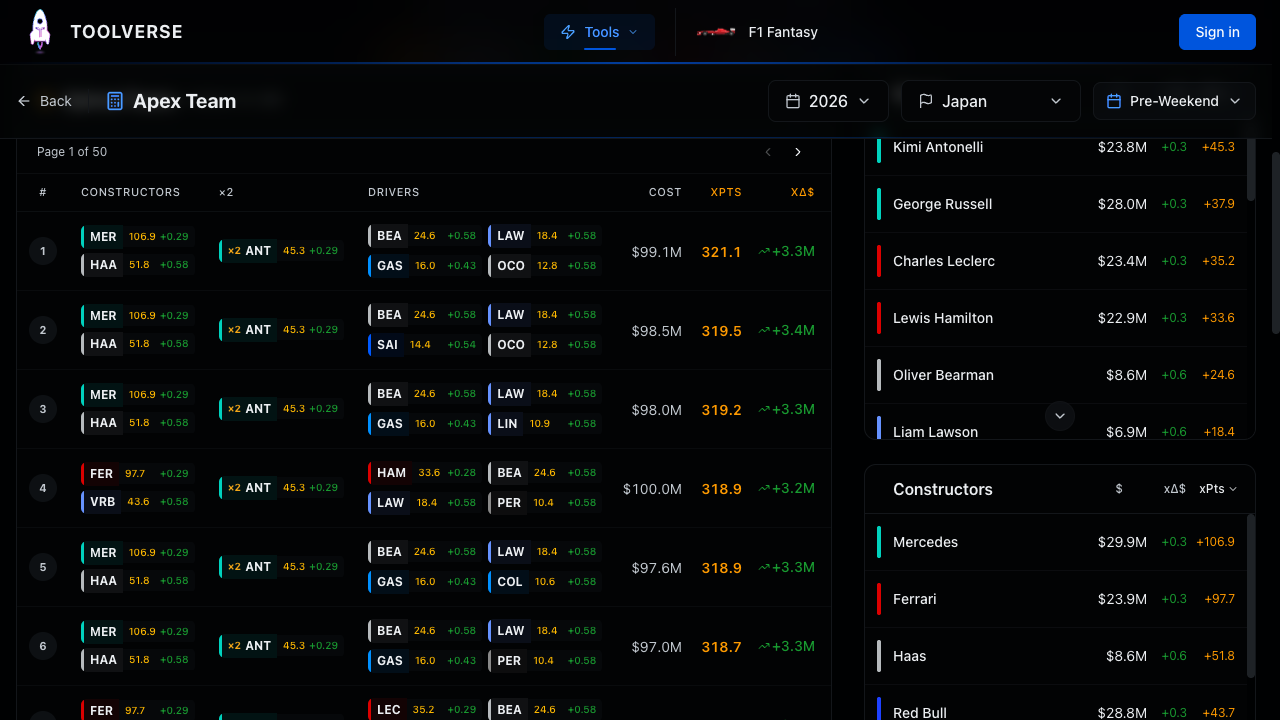
The Apex Team Optimizer shows two key metrics for each team:
- xPts: Predicted total fantasy points
- xDelta: Predicted total price change for the team
During the growth phase, sort teams by xDelta instead of xPts. The optimizer will surface teams that sacrifice a few points for significantly higher expected budget growth. A team that scores 5 fewer points but grows $1.5M more is almost always the better pick in the first 4 races.
You can also use the budget slider to model future scenarios. If your current budget is $100M but you expect $103M after two weeks of growth, set the slider to $103M to see which teams become available at that budget level. This forward-looking analysis helps you plan your upgrade path.
Common Budget Mistakes to Avoid
Starting with five premium drivers. A team of five $20M+ drivers maximizes week 1 points but leaves zero room for budget growth. By Race 5, players who invested in growth picks have $103-105M and are building stronger teams than yours.
Holding falling drivers too long. Emotional attachment to a favorite driver costs real budget. If their PPM drops below 0.6 for two consecutive races, sell. The -$0.3M or -$0.6M weekly loss compounds fast.
Ignoring constructor price changes. Constructors follow the same PPM system as drivers. A midfield constructor that has both drivers in Q3 for three straight races will rise in price. Don't overlook constructor rotation for budget growth.
Making too many transfers. Each point-penalty transfer must be justified by expected future returns. In general, stick to free transfers unless the growth opportunity is exceptional (e.g., a driver about to enter 3 races at their strongest track type).
Forgetting the calendar. F1 has back-to-back weekends and long breaks. During triple-headers, you get three price change opportunities in three weeks. Plan growth strategies around dense calendar clusters.
Frequently Asked Questions
What's a realistic budget target by mid-season?
Competitive players typically reach $103-106M by Race 10. The very best budget managers hit $108-110M. Even reaching $103M gives you meaningful advantages — roughly 25% more valid team combinations than a $100M player.
Should I ever take a point penalty for a transfer?
Only if the expected budget growth significantly exceeds the penalty. A -10 point penalty is worth it if the new driver is expected to rise $0.6M in the next race (Tier B maximum), since that $0.6M generates more than 10 extra points over the remaining season through better team options.
Do constructor transfers count against my free transfer limit?
Yes. Driver and constructor transfers use the same pool of free transfers. This means swapping a constructor costs you a transfer that could be used for a driver rotation. Plan constructor changes carefully.
How does the Limitless chip interact with budget strategy?
Limitless removes the budget cap for one race, letting you build a dream team regardless of cost. It doesn't permanently change your budget. After the Limitless weekend, your original team is restored. Use it when: (a) your budget is tight and the gap between your optimal team and the best possible team is large, or (b) you want to maximize points on a critical weekend without making permanent transfers.
Can my budget go below $100M?
Yes. If drivers on your team drop in price, your effective budget shrinks below $100M. This makes it harder to rebuild because you can no longer afford the same team combinations. This is why avoiding falling drivers is just as important as finding rising ones.
Build Your Budget Strategy Now
Budget management is a season-long game. The decisions you make in the first 4-5 races set the ceiling for your team's potential for the rest of the year. Use the Budget Boost page to identify the highest-probability risers each week, the Apex Team Optimizer to find the best growth-oriented lineups, and check our guide to price changes for the full PPM system explanation. New to the game? Start with our complete beginner's guide.